Cleaning the vents is the safe approach that keeps interior airflow healthier and helps the appliances perform without any stress or lead to any type of energy wastage. A basic cleaning routine can help safeguard its surfaces, prevent hidden dust pockets from forming, and reduce the chances of overheating within the connected systems. The practical steps help them to complete this task confidently and maintain a steady comfort indoors. Effective cleaning becomes more manageable with the help of a dryer vent cleaning kit.
What Comes in a Typical Vent Cleaning Kit?
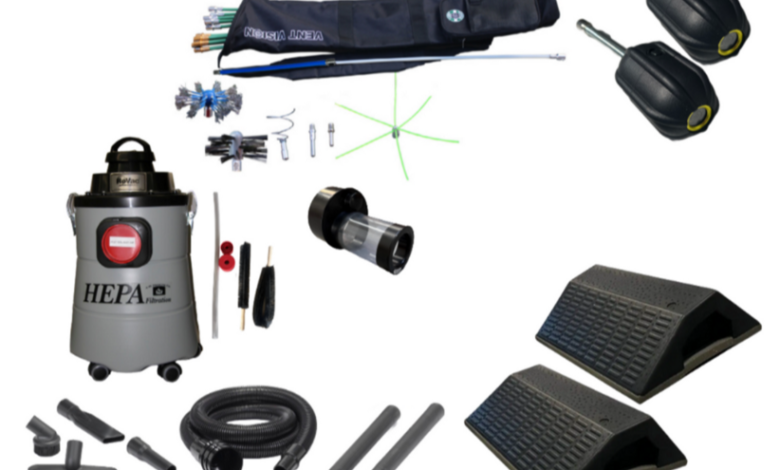
- Extension Rod System
These adjustable rods are attached safely, and they move deep into vents in order to clear up the accumulation. They turn corners and maintain constant pressure during cleaning without straining the duct structure.
- Multi Surface Brush Heads
Changeable brush heads are fitted to various vent shapes and also gather dust. The soft bristles preserve fragile surfaces and aid in other cleaning action steps conducted after running a sanitizing fogger across linked rooms.
- Secure Drill Adapter
This attachment connects the rod system to a household drill. It turns brushes without difficulties and helps loosen debris in long and short vent paths.
- Vacuum Port Attachment
The adapter is attached to either a regular or professional HEPA vacuum cleaner, and it draws loose debris towards the opening. It minimizes airborne particles and helps maintain a clean working environment during the process.
- Protective Screw Tool
It is a tiny piece of equipment used to pull ventilation covers off. It avoids unnecessary destruction around wall plates and allows easy access to tight areas that require frequent cleaning.
Step-by-Step Guide: How to Use a Vent Cleaning Kit Safely
These steps will assist anyone in completing a complete cleaning session in a lucid and relaxed manner. The process helps in safe advancement in every stage and minimizes risks, as well as ensuring consistent control in every tool.
Prepare The Area
An empty area enables easy movement and eliminates accidents around machinery. Appliances or furniture may be moved so that they do not block the vent opening. Gloves and goggles will safeguard against the movement of dust as the equipment starts operating within the duct.
A bright light helps to expose unseen accumulation to avoid leaving any part of the cleaning process, and makes every area observable.
Detach Vent Covers
The screw tool that comes with most of the kits can be used to remove covers. The process permits free access to the surrounding frame and deeper duct areas. Light strokes cushion the opening to ensure that it remains intact when reassembling it later.
When the cover is loosened, dust on its edges can be wiped gently to ensure that loose dust does not fall into the duct pathway when the main cleaning steps are undertaken.
Assemble Cleaning Tools
Rods are installed to eliminate separation within ducts. One of the rods clicks and creates a straight path that will make it move smoothly when cleaning it. The brush head is wound in a way that it is held steady and then rotates or sweeps.
A drill may be added where extra power is required, and yet slow speeds are more controllable. This preparation enhances the stability of the tools and aids in the uniformity of cleaning the vent.
Clean Vent Interior
The brush enters the duct gradually and moves in a constant rhythm as debris starts to loosen. Light force is effective and prevents the duct walls from scratching or bending. Movement proceeds until every part of the vent is clear with no resistance.
Rotational cleaning also needs low drill speeds to ensure safety and precision. Repeat the process until the flow of the debris stops and the duct is open once more.
Vacuum And Recheck
A vacuum hose gathers dust that is loosened around the opening. Constant suction prevents particle dispersion in the air and helps keep the workspace cleaner. The inside of the vents can be examined using a flashlight after vacuum cleaning to verify the cleanliness.
The leftover debris can be loosened by one more stroke of the brush. When the content is removed, the surrounding area is wiped to make the vent appear well-kept and ready to be refitted.
See also: How Smart Home Technology Is Redefining Interior Design
Post-Cleaning Maintenance
- Routine Checks
Light checks at intervals of a few weeks ensure that the airflow is not weak and that dust is not accumulating again. Minor alterations can be made before serious cleaning is done.
- Cover Cleaning
The Vent covers collect surface dust quickly, so a simple wipe keeps them clean. Clean covers improve airflow and minimize new particles entering the system.
- Airflow Monitoring
Early blockage is often indicated by reduced airflow. Airflow monitoring will keep the vent system efficient and avoid unnecessary load on related appliances.
Conclusion
Cleaning the vents consistently helps to build confidence and maintain a healthier space indoors. The cleaning sessions turn effortless when every step is followed thoroughly, and the tools are handled purposefully.
Following practical habits in this process supports long-term comfort and promotes reliable airflow throughout the indoors. Those who maintain the simple routines strengthen safety at home and performance of the equipment that supports a managed approach to the overall vent care.